  Client
Side Image Maps Client
Side Image Maps
You know how to create a graphic image with a single
hyperlink, but did you also know that you can specify additional
hyperlinks. Let's say you've got a picture of a human body - you could set
it up so that if you click on the arms, you go to "arms.htm", legs to go
to "legs.htm" and head to go to "head.htm".
This technique is called an image map. What this means is
you slice up sections of the graphic image and specify, "is someone clicks
here, go to this page". You can slice the image in rectangles, circles and
any kind of polygonal shape.
There are two kinds of image maps: client-side and server
side. This article describes client-side maps, which means the work is
done by your browser. In the case of server-side maps, all of the
calculations and such are done by the server. Why would you use one over
the other? Most people do not have access to the server such that they can
use server-side maps, and client-side image maps are a little bit easier
for most people.
Let's start with a graphic.

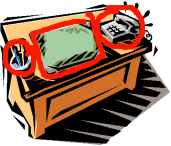 Now
break the graphic up into the clickable areas (these are called hot
spots). For this one, suppose the following: Now
break the graphic up into the clickable areas (these are called hot
spots). For this one, suppose the following:
-
Click on the phone, go to "phone.htm"
-
Click on the desk pad, go to "pad.htm"
-
Click on the pencils, go to "pencils.htm"
The image to the right shows how this might look if you
drew lines around the items.
Now comes the hard part: figuring out the coordinates. You
see, you need to specify the pixel positions within the image for the
rectangles, polygons and circles.
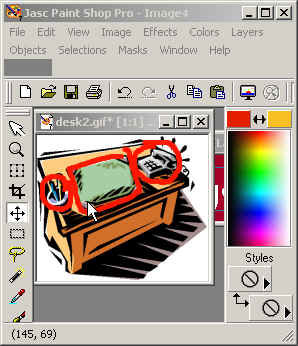 The
image to the left demonstrates a simple, easy way to get these
coordinates. I load the image in Paint Shop Pro, then move the cursor to a
position on the screen. Look down in the lower left-hand corner. You will
see the coordinates. These are directly usable by the image map tags. The
image to the left demonstrates a simple, easy way to get these
coordinates. I load the image in Paint Shop Pro, then move the cursor to a
position on the screen. Look down in the lower left-hand corner. You will
see the coordinates. These are directly usable by the image map tags.
Okay, we're going to define a circle around the phone, a
polygon around the pad and a rectangle around the pencils.
For the circle you will need the pixel position of the
center, the number of pixels from the left side to the center, and the
number of pixels from the top to the center (this allows you to define
ellipses and circles using the same tag).
 For the
polygon, you need the pixel coordinate (x and y) of each corner. For the
polygon, you need the pixel coordinate (x and y) of each corner.
For a rectangle, you simply need the x and y coordinates
of the top left and bottom right corners.
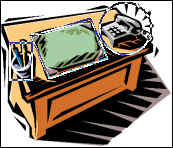
So, for the picture to the left we wind up with the
following tag (notice the hot spots are shown in outline):
<map name="FPMap3">
  <area href="phone.htm" shape="circle" coords="124, 27, 27">
  <area href="pad.htm" shape="polygon" coords="30, 35, 48, 77, 106, 57, 89, 17">
  <area href="pencils.htm" shape="rect" coords="8, 41, 32, 80"></map>
  <img border="0" src="desk.gif" usemap="#FPMap3">
This
defines the client-side image map shown to the left. If you hover your
cursor over the various objects and click, you will see the results.
Okay, there are a few things that you should still do
before you are finished. It's good practice to include ALT tags on your
images. So let's see how that looks with this graphic.
Hover
your cursor over the graphic image to the right. You see how the tool tips
show as you move around over the image? This is done by including ALT tags
within your AREA definitions.
Why do you want to do this? Several reasons. First, some
people surf without graphics. If the image does not display the ALT text
will. This allows your page to work even if the graphics do not display.
Second, by including the text you show tool tips as the
cursor moves over the graphics, which makes it easier to figure out what
to do. Finally, special browsers for disabled (blind) people can read the
text and actually say the words as the cursor hovers over the areas.
The HTML code to produce this result is shown below.
<map name="FPMap4">
    <area href="phone.htm" shape="circle" coords="124, 27, 27"
     ALT="Click here for phone">
    <area href="pad.htm" shape="polygon" coords="30, 35, 48, 77, 106, 57, 89, 17"
     ALT="Click here for desk pad">
    <area href="pencils.htm" shape="rect" coords="8, 41, 32, 80"
     ALT="Click here for pencils">
    </map><img border="0" src="desk.gif" usemap="#FPMap4" width="171" height="146"
     align="right" alt="Silly clipart from Microsoft that comes with Office 2000">


|