  Working
With Images Working
With Images
Ah, now we finally get to the fun stuff. If you ask someone why they
surf the web, many times they will tell you they like looking at graphics.
While what someone is saying on the web is important, it is the graphics
which attract most people to sites.
All right, this is a long tutorial, so let's just plunge right in.
We'll use the following graphic image as an example for these exercises.

An important thing to remember about HTML is it is just text. There is
no such thing as a graphic HTML document. What an HTML document contains
is tags, specifically the
<IMG> tag, which contain the location of the image. Thus as page with
a hundred images is actually a page with 100 <IMG> tags, which contain the
locations (URLs) of each image. This implies there are 101 different files
(assuming each image is different).
Okay, so what this all boils down to is that wonderful, beautiful,
seamlessly designed web page is actually dozens or even hundreds of
different files, each of which can be anywhere on the internet.
To include in image is very simple. You use the <IMG> tag, as shown in
the example below.
<img src="antelope_S.gif">
This results in the image being inserted at the current location in the
document.

It's more professional to specify the size of a graphic when you
include it on your page. This allows the browser to "pre-allocate" the
space on the screen. This enables the browser to load the image more
optimally, and it makes your web page look smoother. This produces the
effect shown below, before the graphic is loaded. Without specify the
size, the browser initially allocates some default size on the screen,
then changes it after the graphic is loaded. Believe me, this looks very
tacky.
![]()
The example below shows how to set the size of the graphic.
<img src="antelope_S.gif" width="95" height="66">
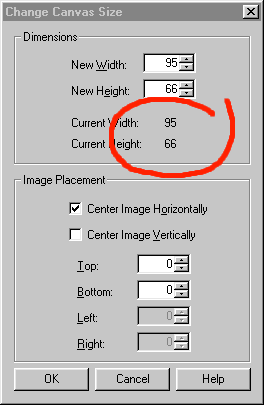
 This brings up
another question right away. How is the image width and height found? Most
graphics programs allow you to examine the properties of the image. In
Paint
Shop Pro, you choose the "Image' menu and select "Canvas Size". An
example of the result of this is shown to the right. This brings up
another question right away. How is the image width and height found? Most
graphics programs allow you to examine the properties of the image. In
Paint
Shop Pro, you choose the "Image' menu and select "Canvas Size". An
example of the result of this is shown to the right.
If you have taken the graphic off a web page, you can use the browser
to get the width. In Internet Explorer, right click on the graphic and
select "Properties" from the popup menu. This will show the size of the
graphic in pixels.
The next thing you need to understand is many people surf without
graphics. In order to provide for their needs, you should always specify
some alternative text to be displayed if the graphic image cannot be found
or is not displayed.
This is done using the ALT argument to the <IMG> tag. And example is
shown below.
<img src="antelope_S.gif" width="95" height="66" alt="This is a deer">
If someone surfs without images or if the image cannot be found, this
results in the following display.
![This is a deer]()
You can see how helpful this is if the image is not displayed.
Now you can play with the alignment of the image. You can display the
image to the right, left or center. This has the added benefit that the
text flows around the image, which can make a page look very slick indeed.
Here is the code to right justify an image.
<img src="antelope_S.gif" width="95" height="66" alt="This is a deer"
align="right">
 As you can
see, the graphic image is placed to the right of this text. This is really
useful in creating web pages. It's a simple way to make the page look
professional. As you can
see, the graphic image is placed to the right of this text. This is really
useful in creating web pages. It's a simple way to make the page look
professional.
Here is the code you need to use to display the image to the left.
<img src="antelope_S.gif" width="95" height="66" alt="This is a deer"
align="left">
 Again, you
can see that the image is flush to the right of the border and the text
flows around the image. In this case the image is to the right and the
text is to the left. Again, you
can see that the image is flush to the right of the border and the text
flows around the image. In this case the image is to the right and the
text is to the left.
If desired, you can give the image a nice border using the BORDER
attribute.
<img src="antelope_S.gif" width="95" height="66" alt="This is a
        deer"

        border="1">

This looks pretty good, eh?
I think that's enough for this tutorial. To learn more about graphics,
see "Graphics",
"GIF images",
"JPG images",
"PNG images"
and "BMP images".
To find out some of the things you should NOT do with images, see "Mistakes
with Graphics".


|